Given the speed and virus-free environment offered by Linux distributions, many users are switching to Linux from Windows these days. Out of the several Linux variants available to a user, Ubuntu has seen wide adoption rates in India.
Soon after installing any operating system a user’s first activity would be to configure internet connection! Though wired (ethernet) and wireless (Wi-Fi) connections work fine with first try, configuring a USB modem can be tricky at times on Linux. This post will throw some light on different ways to configure a USB modem. The instructions are generic and will hold good for different USB modems (like those provided by MTS, TATA Photon etc.).
Also the steps will be similar for other Linux distributions like Mint, OpenSUSE etc.
Using Ubuntu ‘Network Connections’
This is by far the simplest way to configure a USB modem to connect to internet. No additional drivers or software are necessary.
1. Plug your USB Modem into an USB port. The LED light starts blinking and in a while once your modem is recognized you will be able to see an option - New Mobile Broadband (CDMA) connection/New Mobile Broadband (GSM) connection on clicking the Network icon just besides the sound icon on top panel.
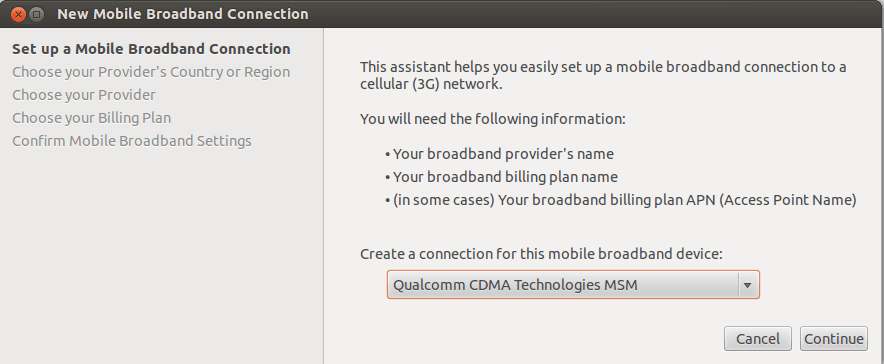
2. Once you click that, you will see this screen which will show your device name. Click ‘Continue’ on the dialog.
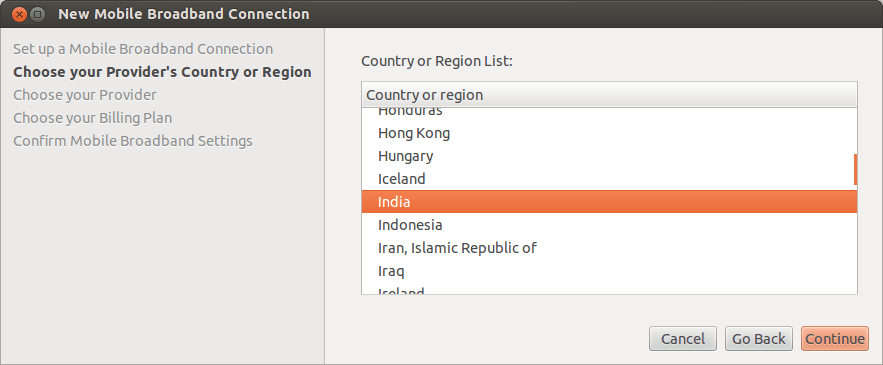
3. In the next screen select country as ‘India’. This will help Ubuntu list Indian service providers in the next screen.
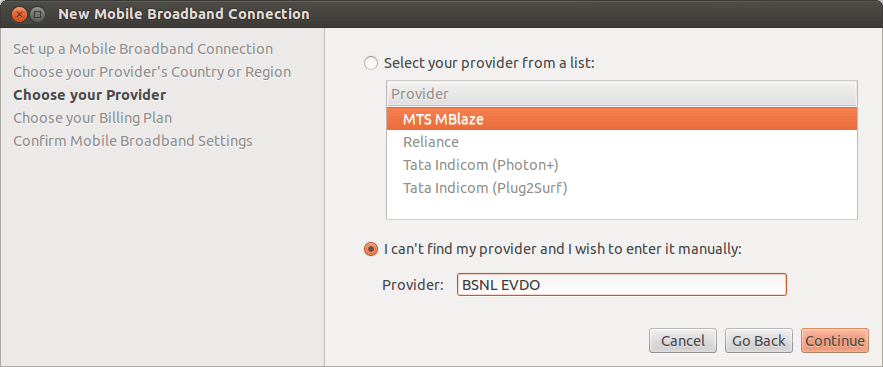
4. In the ‘Choose your Provider’ screen select your service provider. In case it is not listed (BSNL EVDO is not listed) enter it manually in the space provided. In case of EDGE/GPRS/3G connection the service providers list will be long.
5. The choose your billing plan screen appears only when using a EDGE/GPRS/3G connection. If you are configuring a 3G modem, say BSNL you will be required to select proper zone (Eg. OldSouthZoneA...) to use proper APN settings.
6. The last screen is to confirm all the settings and apply them. Click Apply here.
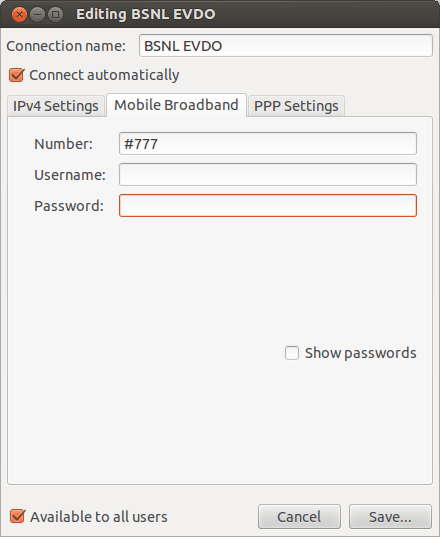
7. Once you click Apply you will be presented with a dialog to enter authentication credentials and minimal configuration settings. Important parameters are to be entered under ‘Mobile Broadband’ tab. The dialing number would be #777 for CDMA connections. It will be set by default. For GSM connections it would be *99#. The username and passwords should be filled appropriately. Typically for BSNL EVDO it would be a 10 digit number.
You may want to select ‘Connect automatically’ as this would help the connection to reconnect in case of disconnection.
Using Linux version of dialer by Modem vendor
Sometimes the CD which comes along with the modem will have Linux version (.deb package for Debian based distributions like Ubuntu, Mint etc.) of the dialer software. In such cases you just need to install it and use it.
Using wvdial
Most new Ubuntu versions detect a modem in few seconds. Only if it does not happen follow this procedure. In older Ubuntu versions I had faced the issue where my device was not recognized by Ubuntu network manager. In such situations wvdial can come to rescue. Wvdial package does not come preinstalled and will have to be installed separately (Not sure about just released Ubuntu 12.10 though). You may have to used an ethernet connection to download the packages and install automatically via Ubuntu Software Center or download .deb files manually and get it in a USB stick. If wvdial is brought this way, you will also have to get .deb files of dependent packages. There will be atleast 3-4 dependencies which need to installed prior to installing wvdial.
The following instructions are for BSNL’s Capitel CDMA modem but others would be similar.
Once you are done installing wvdial, you will have to edit wvdial.conf file to enter necessary details. In a terminal type
gksudo gedit /etc/wvdial.conf
The file contents should look like this after edits:
[Dialer Defaults]
Modem = /dev/ttyUSB3
Init1 = ATZ
Init2 = ATQ0 V1 E1 S0=0 &C1 &D2 +FCLASS=0
Stupid Mode = 1
Modem Type = Analog Modem
Phone = #777
New PPPD = yes
ISDN = 0
Username = 9180****** (your username)
Password = 9180****** (your password)
Baud = 9600
Once you save the file, run the following commands. (You will have to run these two commands every time you connect to internet. I assume that you boot your PC, log in, plug in the modem, wait for a while and run the commands)
sudo wvdialconf
sudo wvdial
Once you run the second command the modem tries to connect and once connection is successful, you will be shown the IP and DNS addresses. If you close the terminal window, the connection will stop working. So let it remain minimized. To disconnect use Ctrl + C with terminal window in focus. To use terminal for other purposes, you can use a new tab.
For advanced users
Advanced users can append & to sudo wvdial to send the process to background and get it back with fg command. The limitation here is you will not be able to see if the connection is successful or not without going to browser. Other options include using screen command, disown etc.
Did you face any issues while configuring your USB modem with Ubuntu or any other Linux distribution? If yes, how did you solve it? Let us know through comments.


